You may have noticed a new request for cookie permissions on the Fireplace Aquarium. Nothing nefarious here, Google Analytics and such. Ordinarily I wouldn’t be bothered with this kind of thing but I was notified that Microsoft Clarity would do something threatening (I didn’t really pay attention to what) if the situation was not fixed. Seems the way of the future with Google heading that way as well. I do use the Google Search Console mainly to track whether anything has gone wrong with how the site interacts with the world.
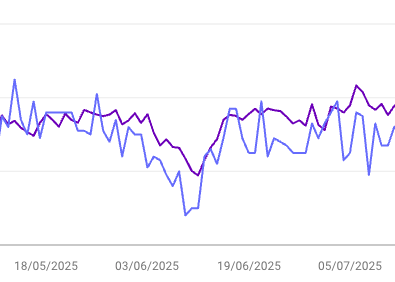
Here’s an example of how things can go wrong. See the dip in clicks and impressions that started in early June this year? That triggered a lot of calls to Dreamhost support because apparently Google was blocked from accessing the entire site. Eventually things got fixed and all back to normal. Still, it was helpful to be able to see there was an ongoing issue that needed resolution.
Implementing GDPR-compliant cookie permissions
Ok, having decided to go the GDPR compliant route, next question is how to do it? Turns out there is a relatively harmless WordPress plugin called CookieYes (although it is also totally fine with me if in response you say “Cookie NO!”) which has lots of people using it and excellent ratings. I installed it and it was mostly straightforward to get going. Then it got complicated…
Google consent mode
Google has what they call ‘Google Consent Mode‘ (GSM) which similarly ensures all good with cookie permissions. This is NOT easy to implement correctly. The CookieYes platform kept telling me it wasn’t turned on, or was turned on but didn’t happen in the right order, or perniciously (from my point of view) that “Default consent set too late” which apparently is also a deal-breaker.
I don’t think a human can make it work. Solution: get an AI to help. Progress on AI has been absolutely phenomenal over just the last six months. These went from semi-joke just-make-a-bunch-of-stuff-up to actually incredibly useful. In this case I went with ChatGPT5 (pro version). Many, many back-and-forths and uploaded screenshots later, it all came together in a brilliant No error detected from CookieYes.
Unlike some of its predecessors, ChatGPT5 doesn’t really get very philosophical but I did ask it why the whole process was so complicated and difficult. Here’s what it said:
- Many knobs, many silos: CMP (CookieYes), GTM, GA4, WordPress, Site Kit, Autoptimize, cache/CDN. Each has different UX, terminology, and sometimes no public API.
- Load‑order is brittle: One plugin adding a snippet in the wrong hook breaks compliance. AI needs reliable programmatic control, not just UI clicking.
Agentic AI – who is the agent?
Well… today it felt like I was the agent. The AI knew everything and just needed a button-pushing monkey (me) to make it actually happen in the real world. Rate of progress with these things, I expect shortly to be able to task the AI “make my cookies GDPR compliant” and hand it over a couple of passwords and hey-presto job done.
I for one welcome our robot overlords…